> ## Documentation Index
> Fetch the complete documentation index at: https://docs.spread.so/llms.txt
> Use this file to discover all available pages before exploring further.

# 문서 (Documents)

> 문서 공유부터 열람 추적까지, 리드의 관심을 한눈에 파악할 수 있습니다.

## Overview

Spread의 문서를 통해 링크 형태로 문서를 편리하게 공유하고, 리드의 열람 여부를 쉽고 빠르게 추적할 수 있습니다.

<img src="https://mintcdn.com/relate-2lkj43/BGeTVfAzFLYA_wI1/images/docs/docsintro.png?fit=max&auto=format&n=BGeTVfAzFLYA_wI1&q=85&s=222d70bbcbc1bdb7c50dbe4d2a33ae06" alt="docs1" width="2106" height="1430" data-path="images/docs/docsintro.png" />

<br />

## 문서 기능 가이드 \[Step-by-Step]

### Step 1. 문서 생성하기

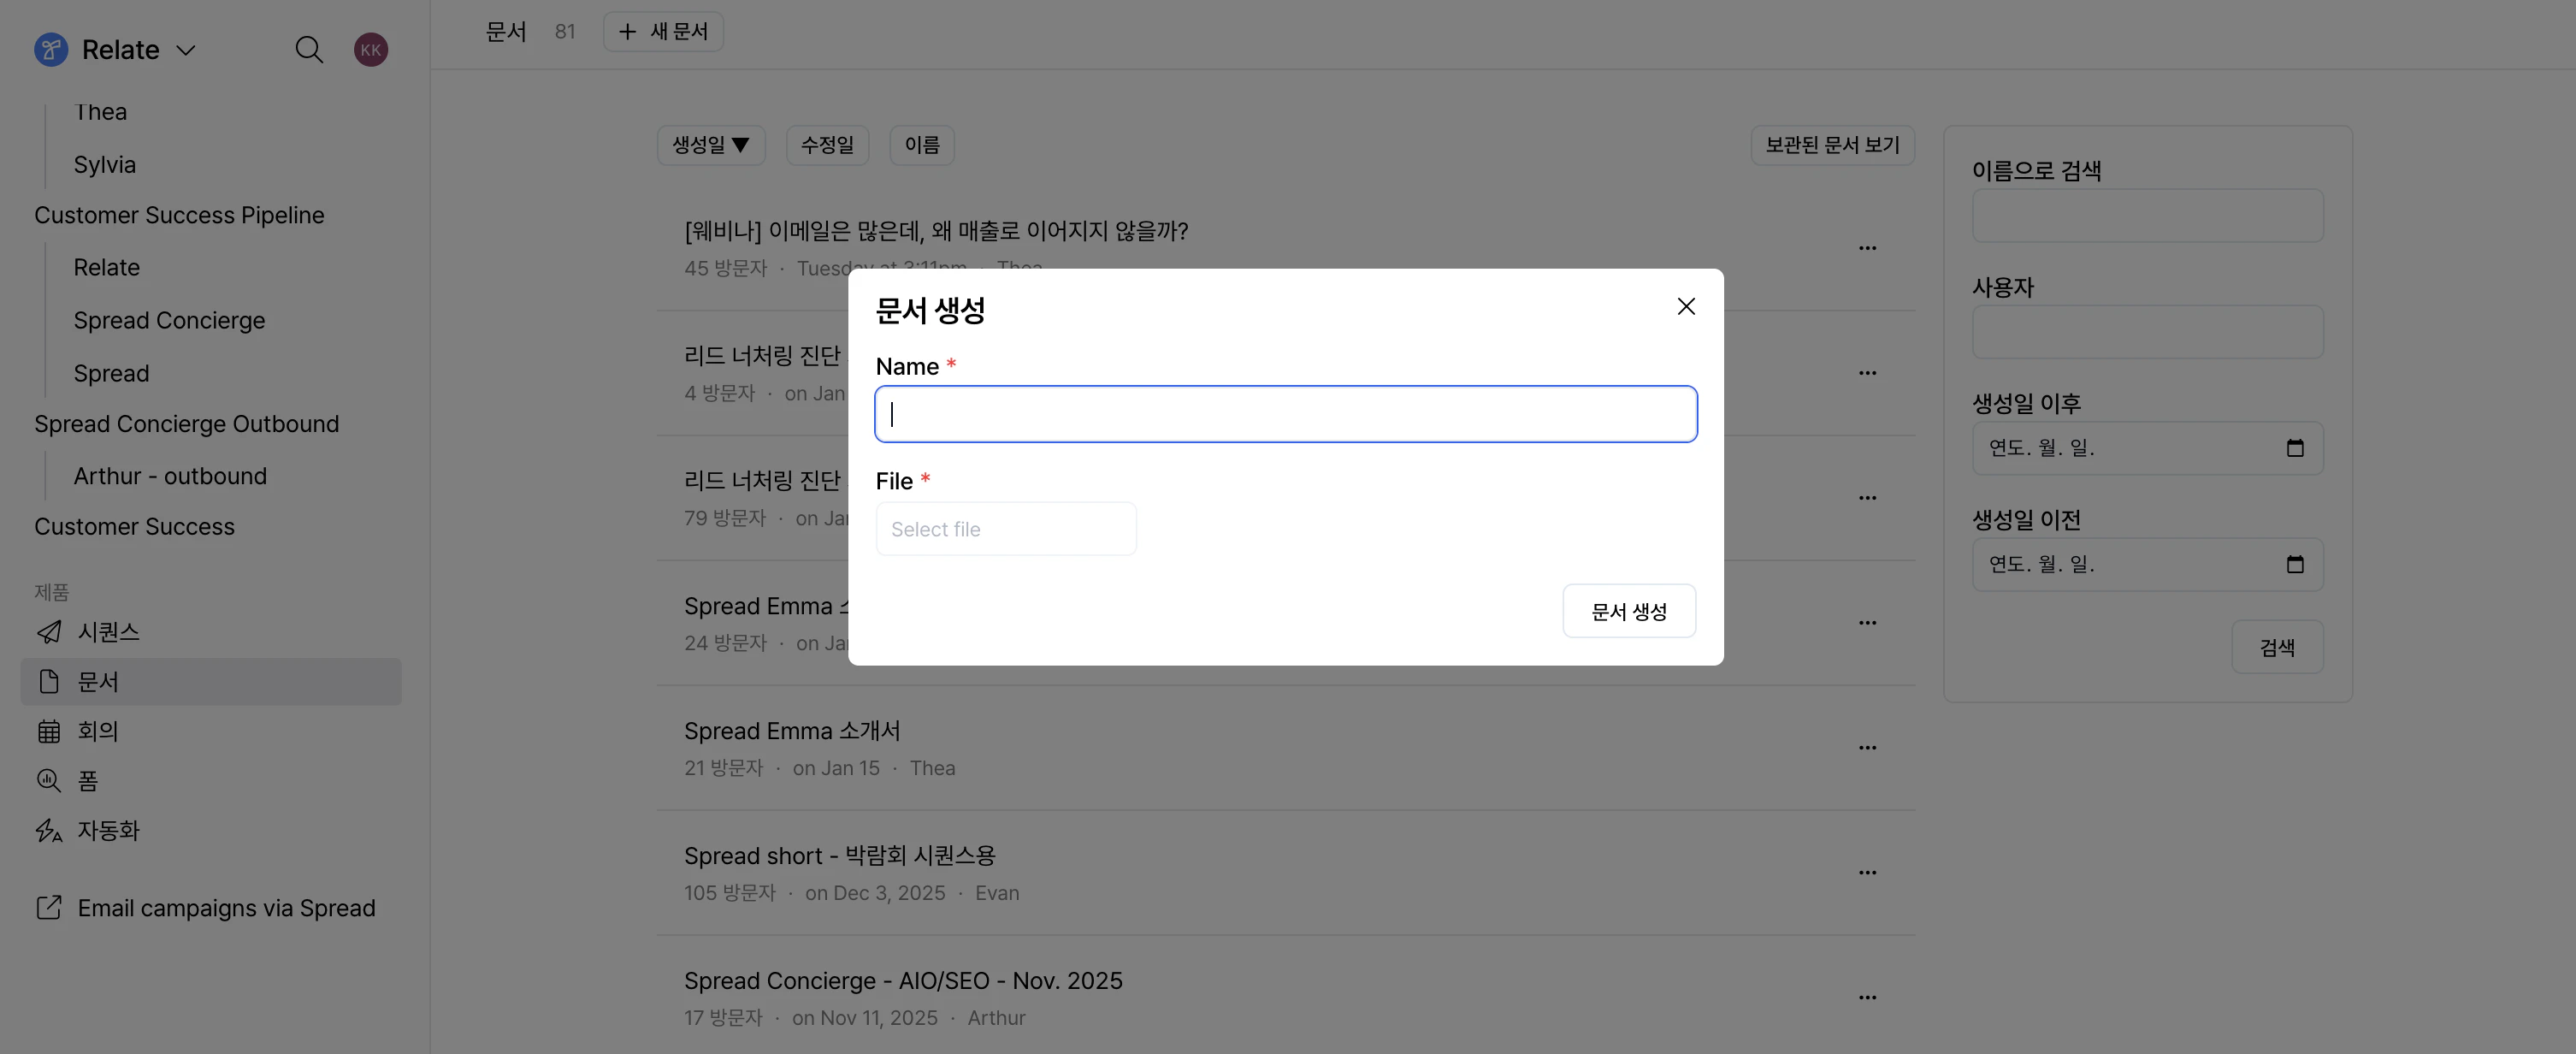
Spread 앱의 좌측 사이드바에서 `문서` 페이지로 이동한 후, 상단의 `+ 새 문서` 버튼을 클릭하여 문서를 생성합니다.

<div style={{ display: "flex", justifyContent: "center", marginTop: "6px" }}>
  <img src="https://mintcdn.com/relate-2lkj43/giFqnhuUHDduWWDl/images/docs/makedocs.png?fit=max&auto=format&n=giFqnhuUHDduWWDl&q=85&s=0d606f388c650c233265709fc95f5b02" alt="Make docs" style={{ width: "100%", maxWidth: "100%", height: "auto", boxShadow: "0 12px 30px rgba(0, 0, 0, 0.18)", borderRadius: "8px" }} width="3012" height="1232" data-path="images/docs/makedocs.png" />
</div>

리드에게 전달할 문서(예: 영업자료, 제안서, 계약서 등)의 PDF 파일을 업로드합니다.

<div style={{ height: "10px" }} />

### Step 2. 문서 공유 링크 생성하기

문서를 생성하면, 해당 문서에는 기본 공유 링크(**Default link**)가 자동으로 생성됩니다.
이 기본 링크는 별도의 설정 없이도 바로 고객에게 공유할 수 있습니다.

추가적인 조건이 필요한 경우에는 `+ 새 링크` 버튼을 클릭하여 문서 공유용 링크를 새로 생성할 수 있습니다.

<div style={{ display: "flex", justifyContent: "center", marginTop: "6px" }}>
  <img src="https://mintcdn.com/relate-2lkj43/giFqnhuUHDduWWDl/images/docs/makelink2.png?fit=max&auto=format&n=giFqnhuUHDduWWDl&q=85&s=6ee2f706fa2c93fcf40e9521baf8f74e" alt="Make link" style={{ width: "60%", maxWidth: "640px", height: "auto", boxShadow: "0 12px 30px rgba(0, 0, 0, 0.18)", borderRadius: "8px" }} width="1088" height="1024" data-path="images/docs/makelink2.png" />
</div>

새로 생성한 링크에는 다음과 같은 옵션을 설정하여 문서 공유 방식을 세밀하게 설정할 수 있습니다.

* `보기 위해 이메일 필요`
  * 문서를 열람하기 전에 이메일 주소 입력을 요구합니다.
  * 이메일을 입력한 리드는 [펄스](/pulse)에서 열람 이벤트로 추적됩니다.
* `다운로드 허용` : PDF 파일 다운로드 가능 여부를 설정합니다.
* `비밀번호 필요` :	문서 접근 시 비밀번호 입력을 요구하여 보안을 강화할 수 있습니다.
* `만료일` : 지정한 날짜 이후에는 링크 접근이 제한됩니다.

또한 하나의 PDF 문서에 대해 여러 개의 공유 링크를 생성할 수 있어,
수신자 또는 그룹별로 개별적인 열람 트래킹이 필요한 경우에도 유용합니다.

<Tip>
  문서를 수정하려면 우측의 `+ 새 버전 업로드` 버튼을 클릭하여
  기존 문서를 새로운 파일로 업데이트할 수 있습니다.

  수신자는 동일한 링크를 통해 항상 최신 버전의 문서를 확인하게 됩니다.

  각 버전은 내부적으로 구분되어 저장되므로,
  문서 업데이트 전후의 열람 지표와 리드 반응을 버전별로 비교할 수 있습니다.
</Tip>

<div style={{ height: "10px" }} />

### Step 3. 열람 여부 및 관심도 추적

위에서 생성한 링크를 공유하면, 수신자는 PDF 브라우저 뷰어를 통해 문서를 보게 됩니다.
수신자가 콘텐츠를 읽거나 탐색하는 동안 Spread Docs는 백그라운드에서 조용히 작동하며, 고객의 다양한 참여 지표를 추적합니다.

<div style={{ display: "flex", justifyContent: "center", marginTop: "6px" }}>
  <img src="https://mintcdn.com/relate-2lkj43/giFqnhuUHDduWWDl/images/docs/full.png?fit=max&auto=format&n=giFqnhuUHDduWWDl&q=85&s=839c067a239967173f25f456feba01d1" alt="Docs overview" style={{ width: "100%", maxWidth: "100%", height: "auto", boxShadow: "0 12px 30px rgba(0, 0, 0, 0.18)", borderRadius: "8px" }} width="2496" height="1304" data-path="images/docs/full.png" />
</div>

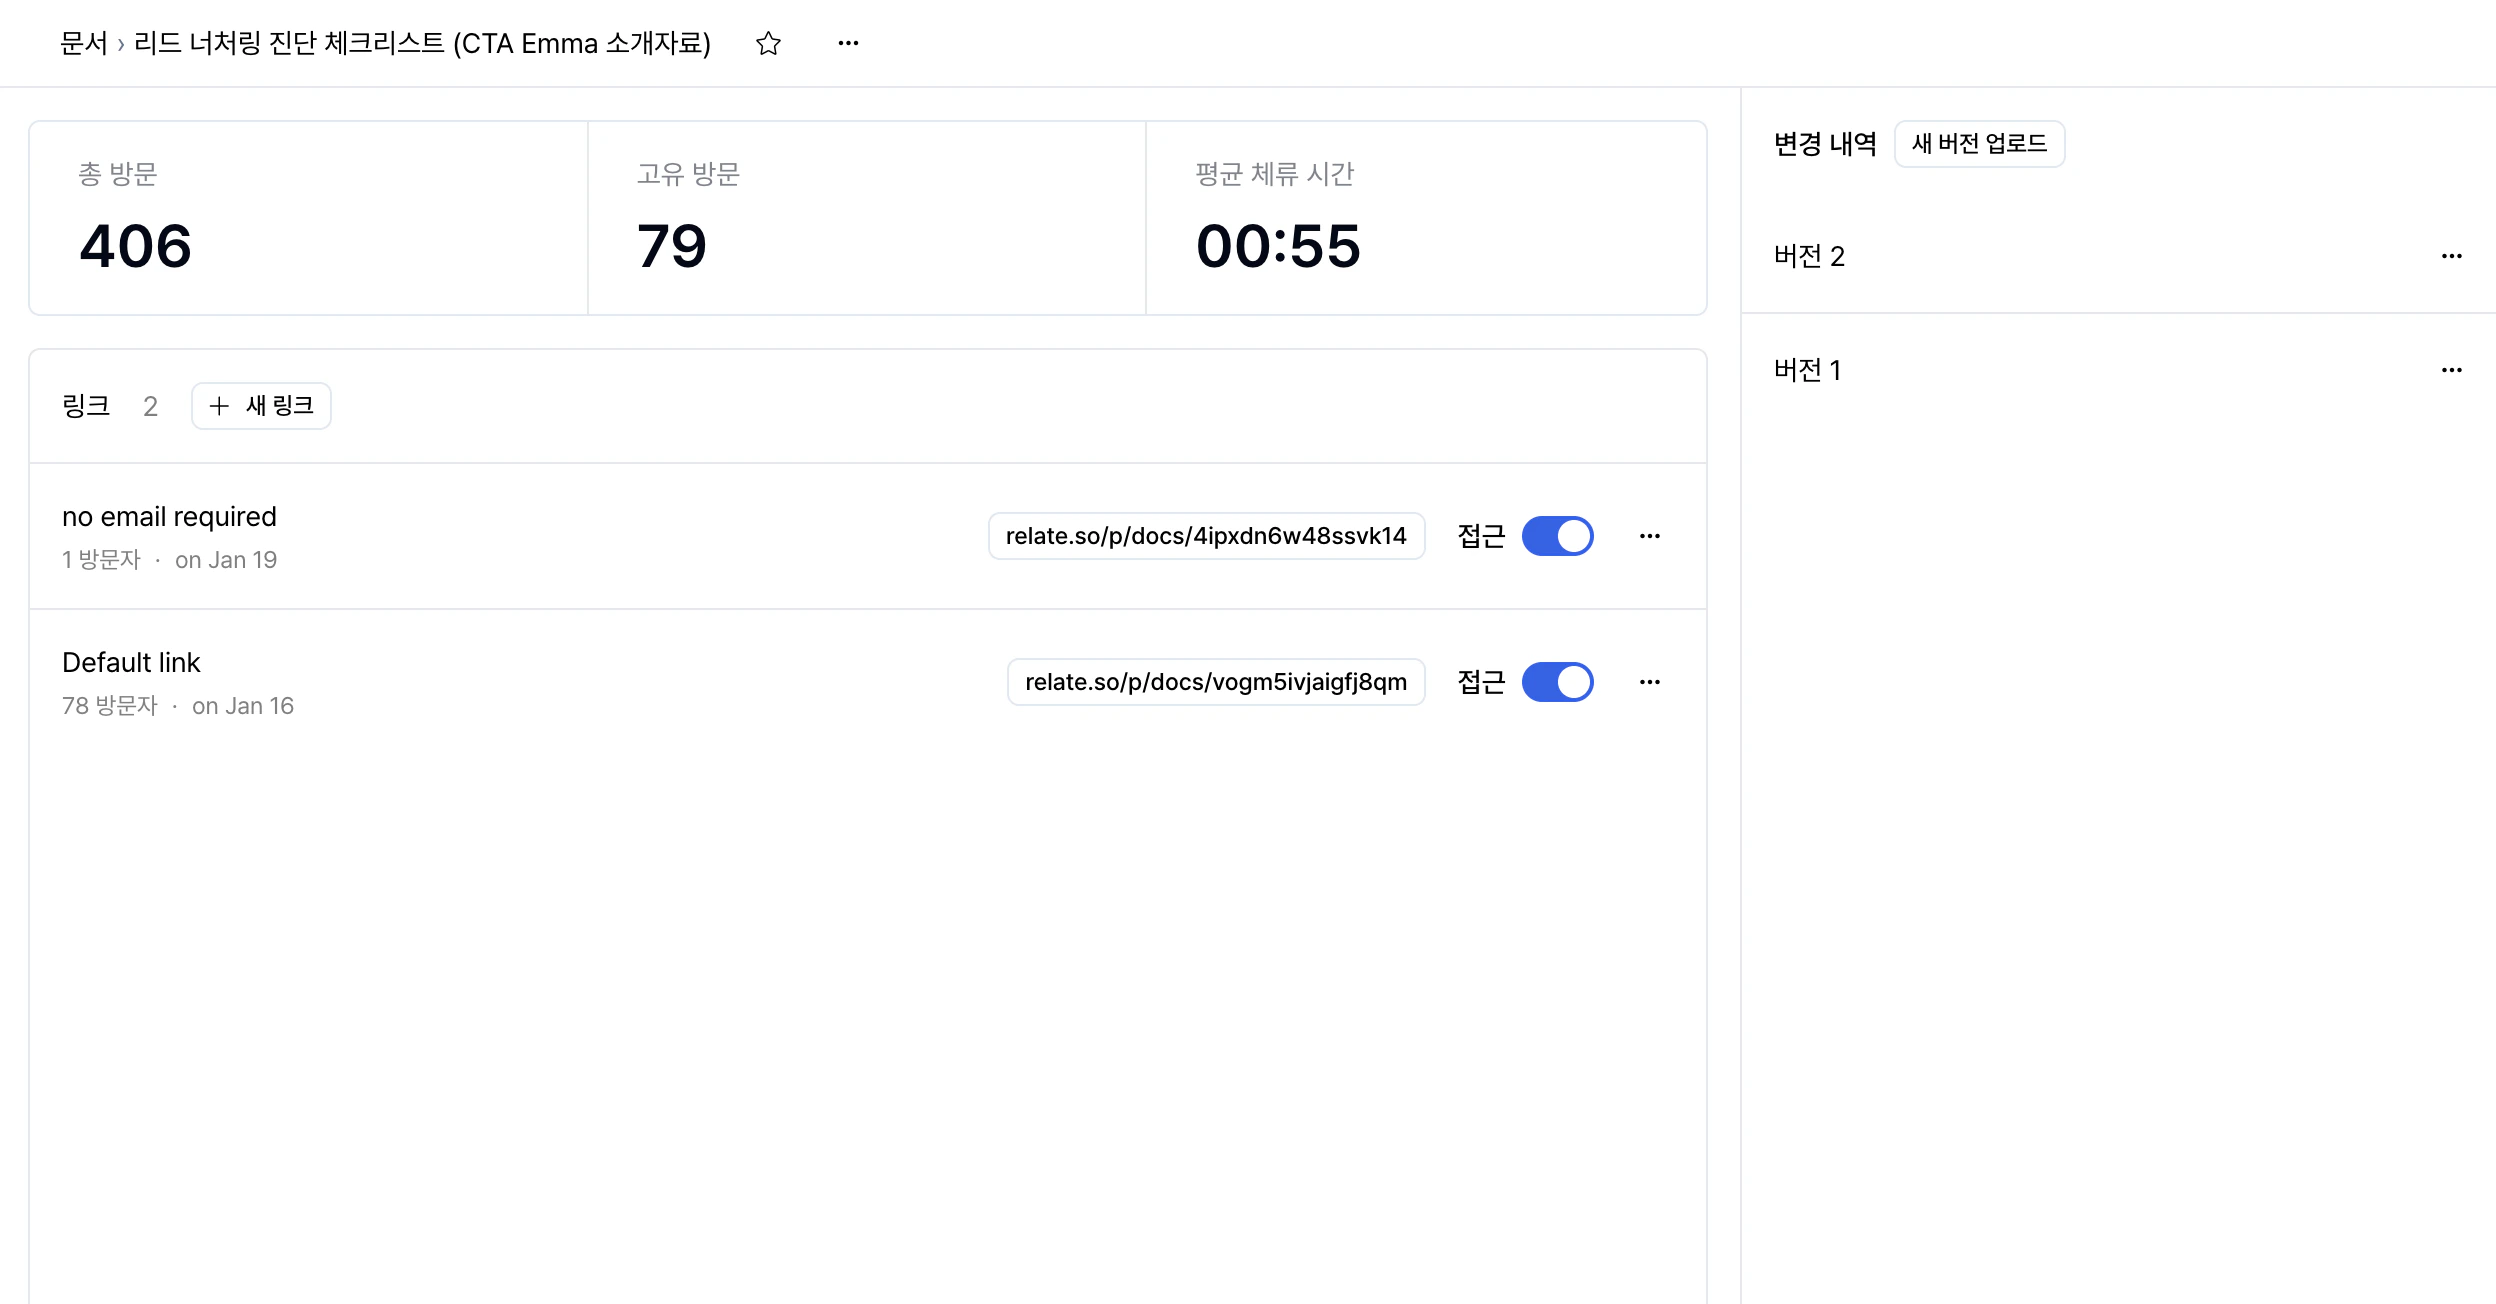
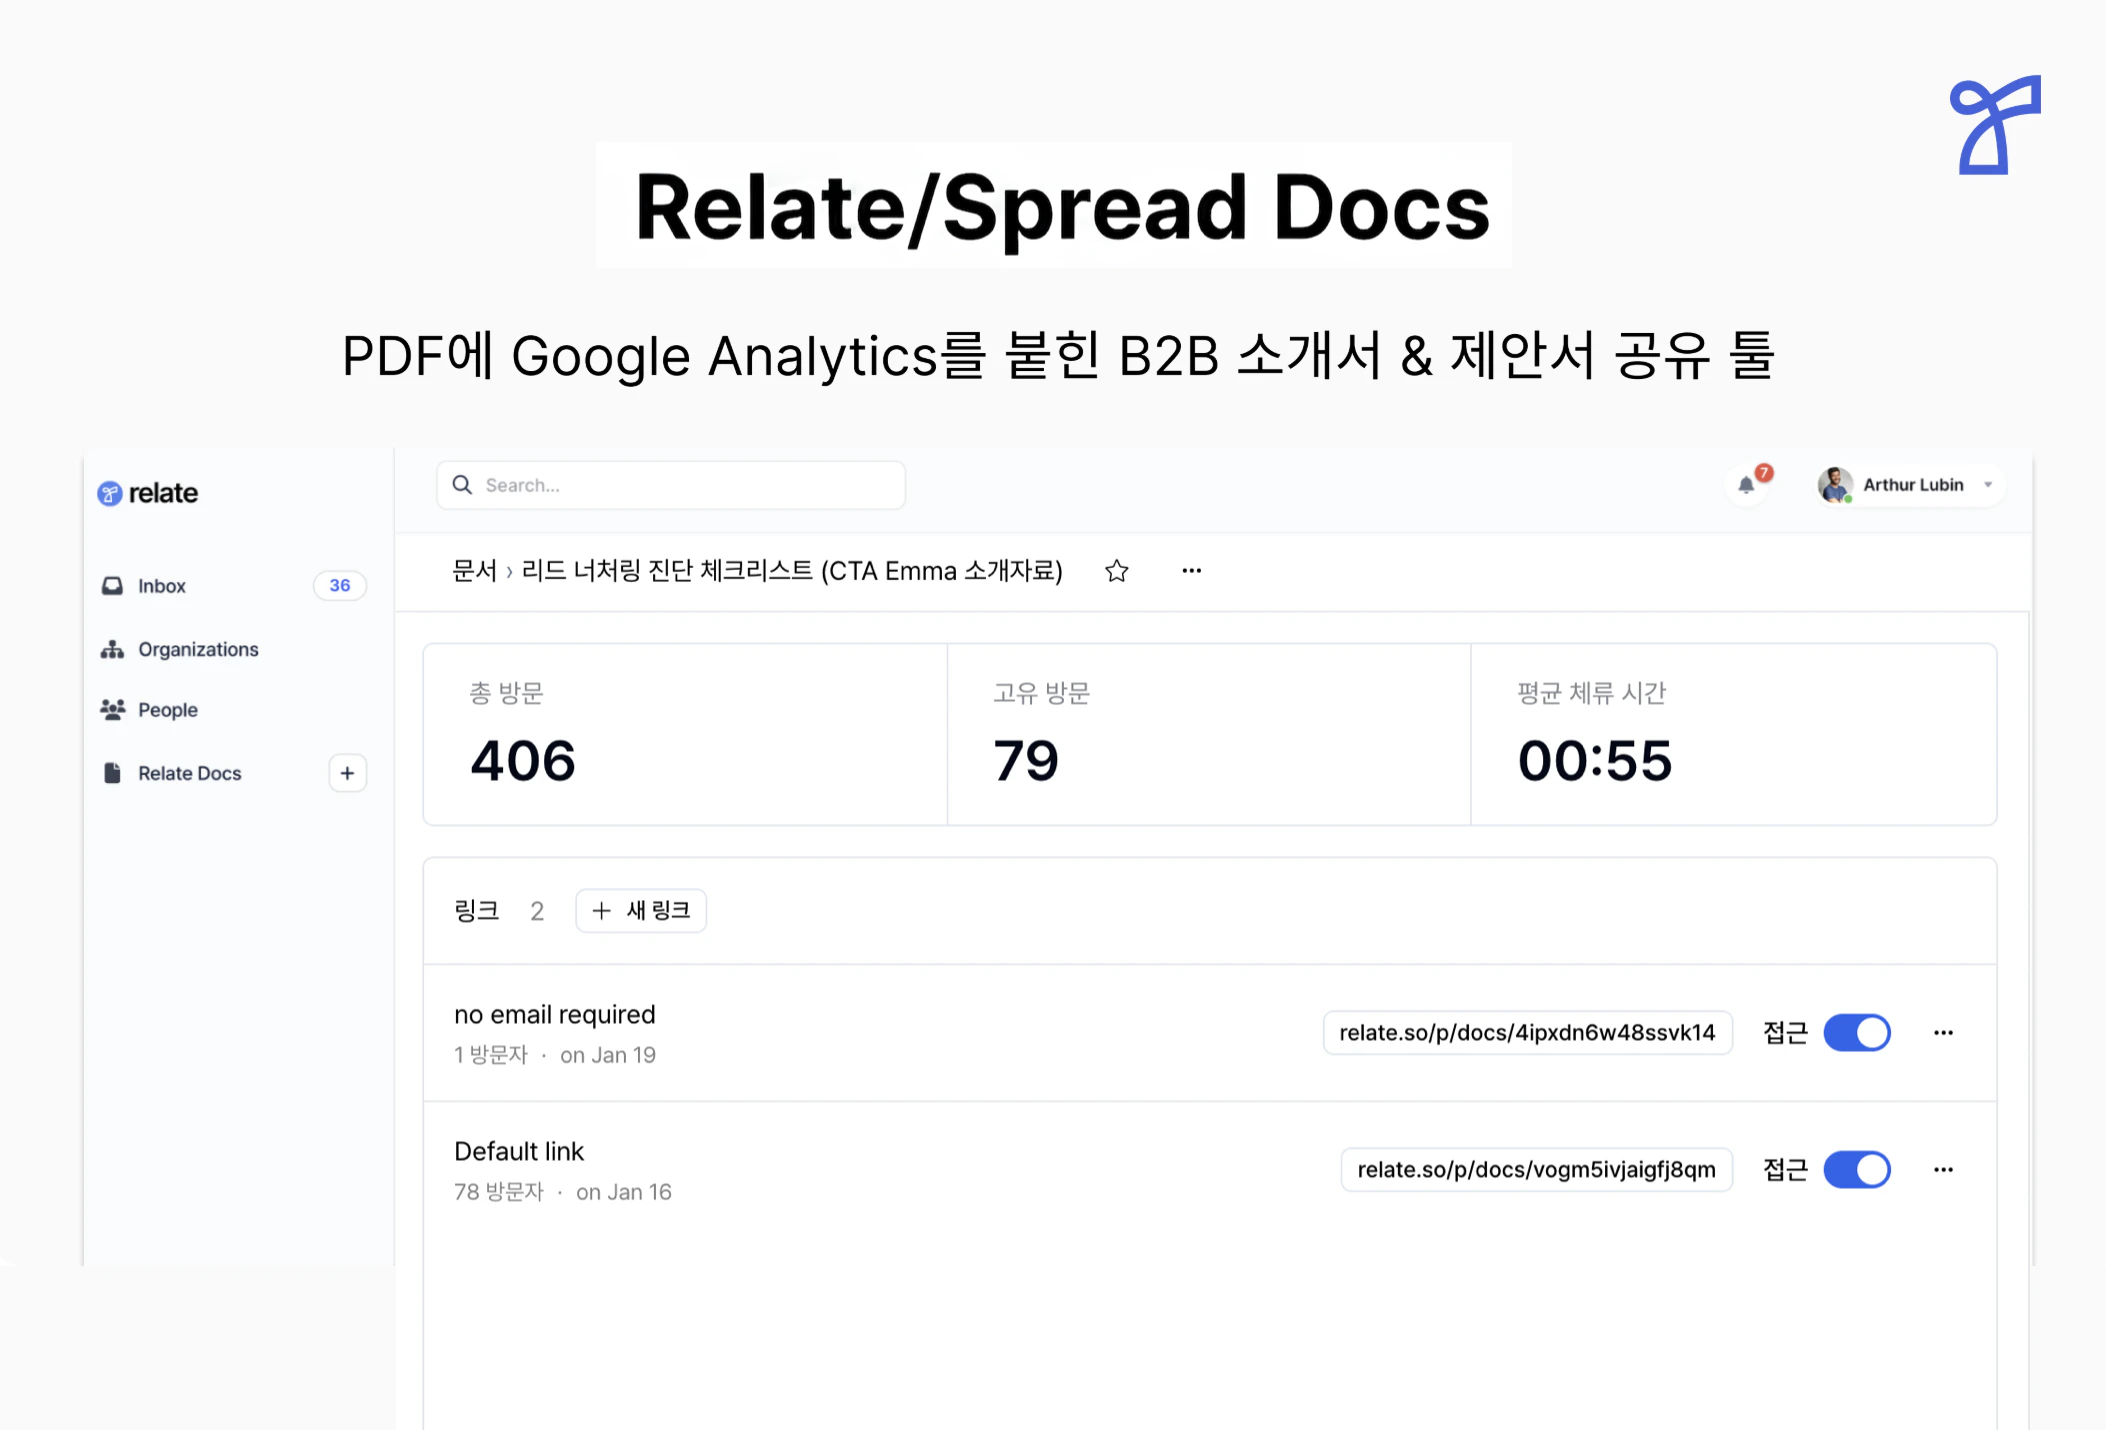
각 문서 페이지의 상단에서는 다음 세 가지를 확인할 수 있습니다.

* **총 방문** : 중복을 포함한 방문 수로, 한 고객이 여러 번 본 것도 모두 포함합니다.
* **고유 방문** : 중복을 포함하지 않은 방문 수로, 한 고객이 여러 번 열람하더라도 한 번만 포함합니다.
* **평균 체류 시간** : 고객들이 문서를 열람한 평균 시간입니다.

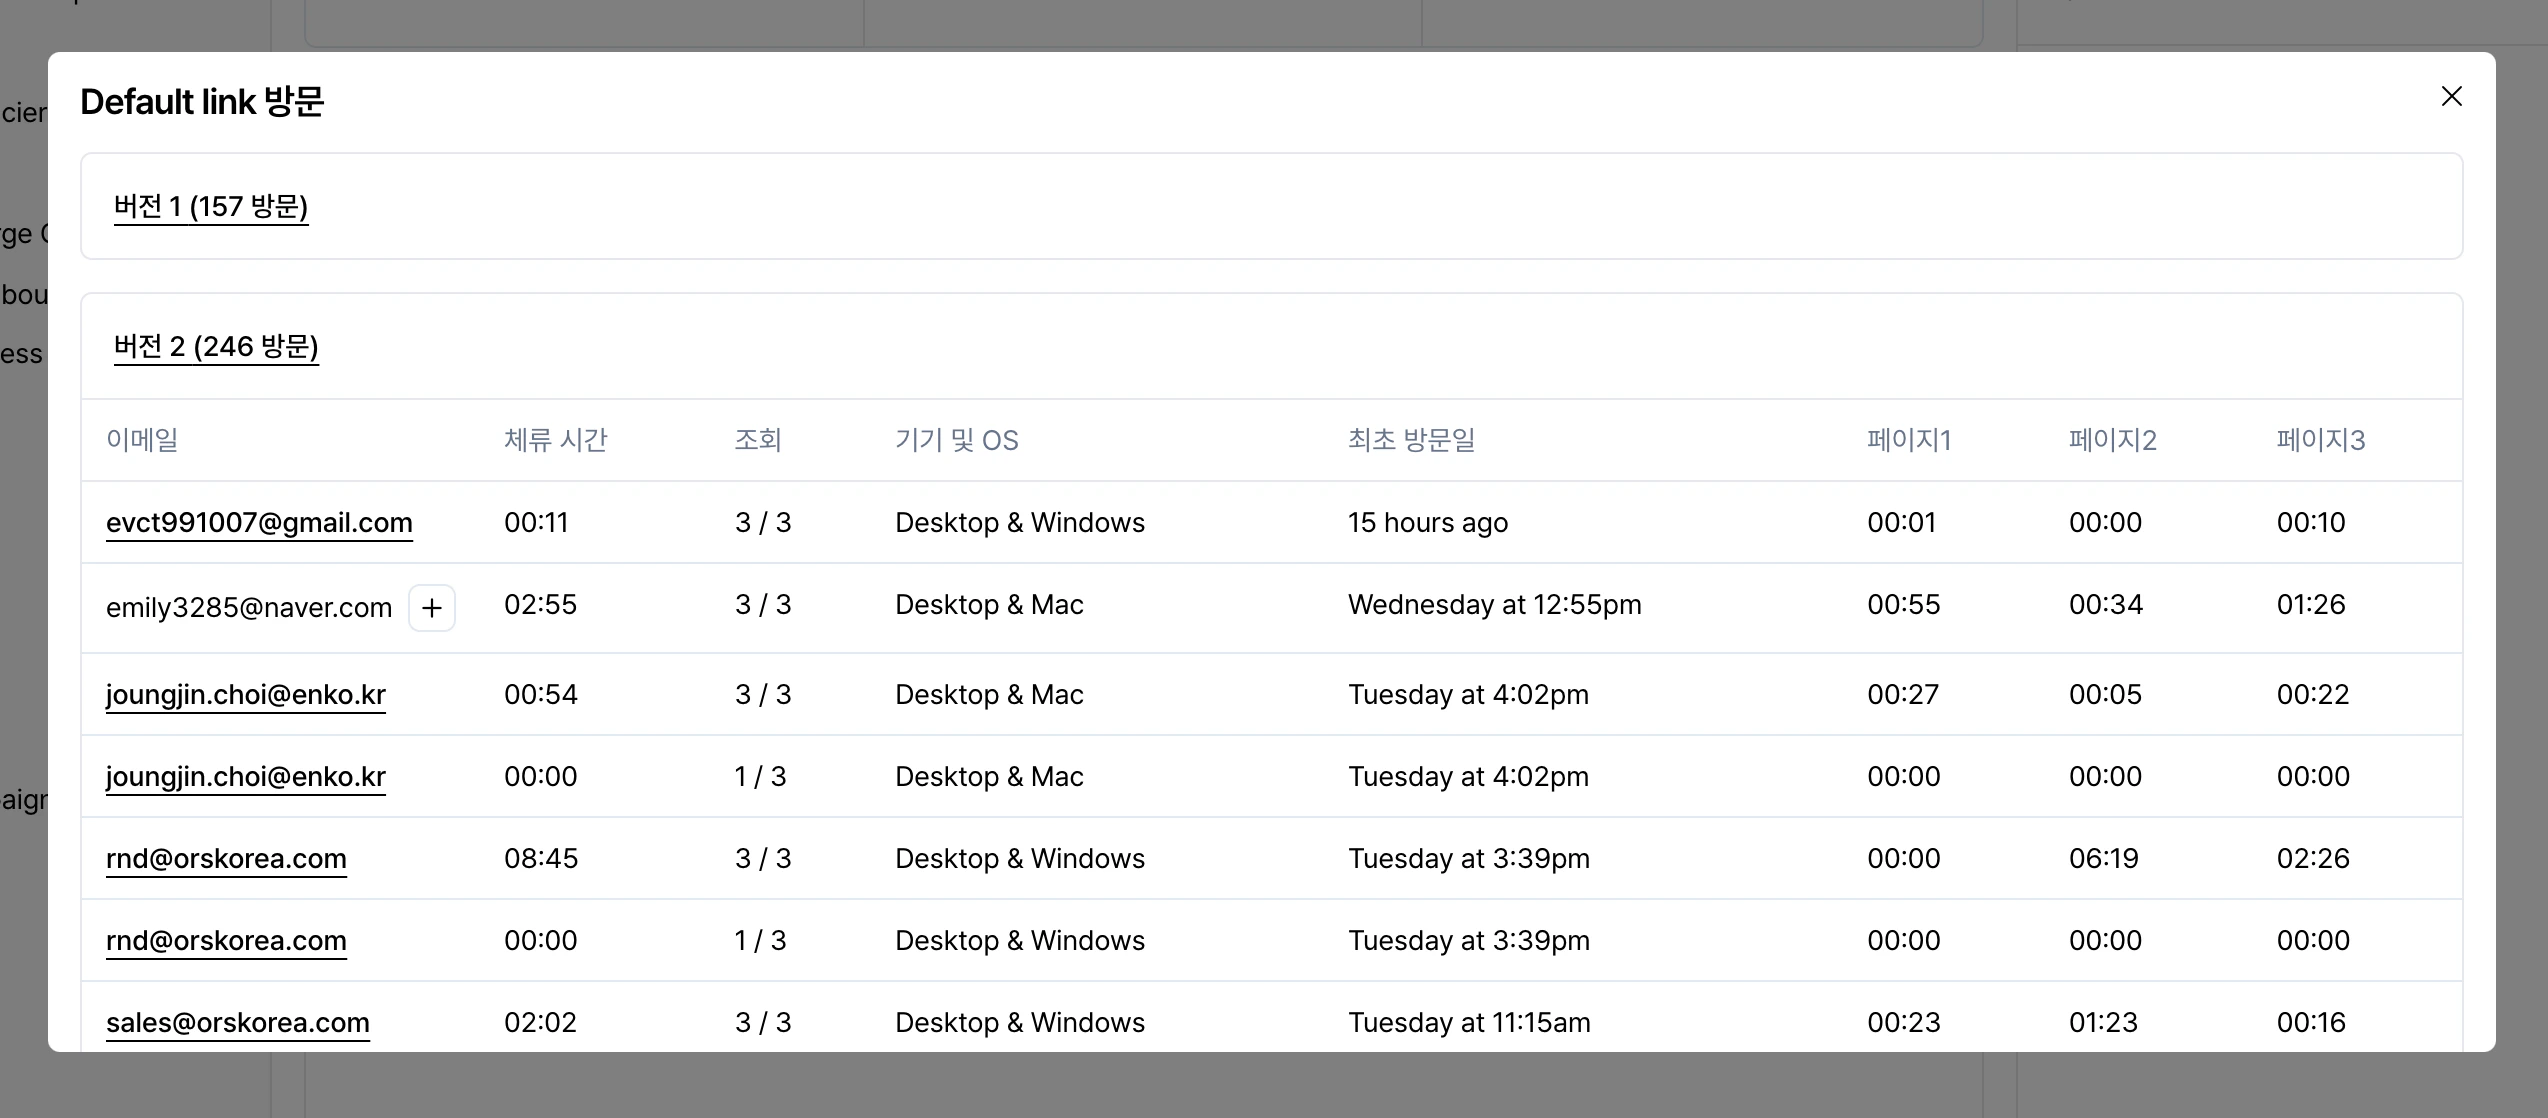
생성된 링크별로 지표를 확인하기 위해서는 각 링크를 클릭합니다.

<div style={{ display: "flex", justifyContent: "center", marginTop: "6px" }}>
  <img src="https://mintcdn.com/relate-2lkj43/giFqnhuUHDduWWDl/images/docs/linkpulse.png?fit=max&auto=format&n=giFqnhuUHDduWWDl&q=85&s=79ef498ccd5b5039eacbdc87289aae8e" alt="Link pulse" style={{ width: "100%", maxWidth: "100%", height: "auto", boxShadow: "0 12px 30px rgba(0, 0, 0, 0.18)", borderRadius: "8px" }} width="2548" height="1118" data-path="images/docs/linkpulse.png" />
</div>

이때 확인할 수 있는 지표는 다음과 같습니다.

* 링크별로 접속된 이메일 계정
* 문서 총 체류 시간
* 페이지별 체류 시간
* 최초 방문일
* 접속 디바이스

접속한 사람들의 이메일 주소와 총 체류 시간 등을 확인하여, 세일즈 의사결정에 유용하게 활용할 수 있습니다.
이렇게 기업은 Spread 문서(Documents)를 통해 고객의 참여도와 관심도를 파악하는데 유리한 고지를 점하고, 더불어 기업의 중요 정보가 담긴 문서들의 소유권 및 통제권을 간편하게 제어할 수 있습니다.

***

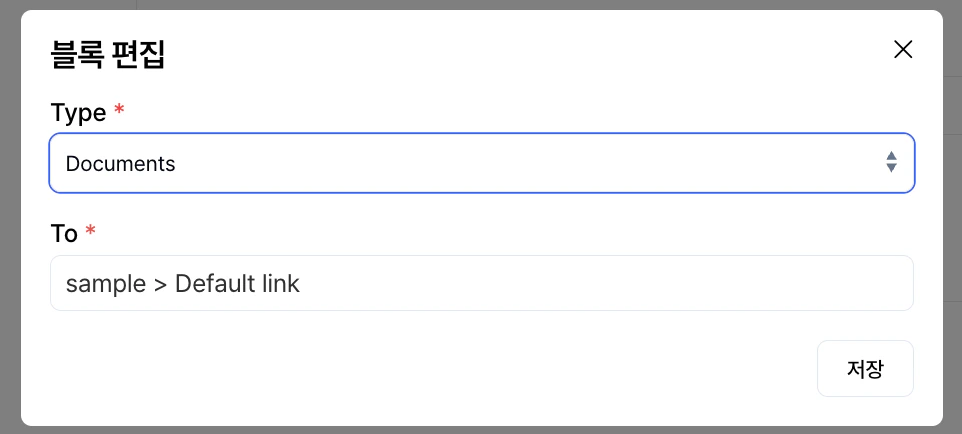
## Spread의 [폼(Forms)](/forms)과 함께 사용하기

폼을 작성한 고객에게 바로 문서를 공유하고 싶다면, [폼의 라우팅 설정](/forms#3-라우팅-routing-설정)을 활용할 수 있습니다.

블록 편집 창에서 아래 스크린샷처럼 Type을 Documents로 설정한 후 해당 문서를 선택하면, 폼 작성 완료 시 바로 문서를 확인할 수 있도록 화면이 바뀝니다.

<div style={{ display: "flex", justifyContent: "center", marginTop: "6px" }}>
  <img src="https://mintcdn.com/relate-2lkj43/giFqnhuUHDduWWDl/images/docs/formrouting.png?fit=max&auto=format&n=giFqnhuUHDduWWDl&q=85&s=1f1db0757ac095b82cef2a8d51162051" alt="Form routing" style={{ width: "60%", maxWidth: "640px", height: "auto", boxShadow: "0 12px 30px rgba(0, 0, 0, 0.18)", borderRadius: "8px" }} width="962" height="434" data-path="images/docs/formrouting.png" />
</div>
